Haul Out 2021
 |
| On the Travel Lift at Twin Rivers Marina, Crystal River |
This is the second time I have hauled out Pau Hana since we purchased her in June of 2020. The first was right after we bought her. See "The Dreaded Dripless Shaft Seal Part II".
This time I had a couple of issues I wanted to attend to. She had been in the water almost a year and a half. If you read the Blog Entry "Movin' on Up...or Down"then you might remember that one of those issues was the Keel Protector. It had sustained some damage when we hit a rock on our way to Tampa.
 |
| Minor Damage to the Keel Protector |
Also, I had a slight vibration only at 1200 RPM, above or below that, was fine. Coming past Madeira Beach this summer at idle speed, we heard a strange "pop" sound and a momentary RPM reduction, then all seemed normal. I couldn't tell for sure but thought I heard a different sort of sound when running. I suspected we picked up a rope in the Intercoastal but since the water had cooled significantly I was frankly too lazy to jump in the water and investigate.
 |
| Just as I suspected...a Crab Trap Line |
Then there was the bottom. The paint looked fairly new when we bought her but I figured if I was going to haul out, I might as well inspect it and most likely put a fresh coat of anti-fouling paint on.
I am never satisfied. Early on when I did the prop and shaft seal work (See "Prop Walk") there was a ding in the prop from the beginning. Homosassa Prop removed it and cleaned up the prop. He mentioned the prop was getting "pretty thin". Although it isn't super imperative with a boat of this "slow" caliber, I was never able to achieve full Rated RPM. I purchased a new Left Hand 20" 4 blade prop with a 19" pitch, no cup. The existing prop was a 20" pitch, no cup. Based on the transmission, the prop representative I spoke to suggested an 18" pitch. I kind of suspected that but decided to go in the middle and get the 19" pitch. I didn't want to lose whatever speed at my normal cruising RPM of 2100 I already had.
Last, again since it was out of the water, might as well buff and wax the hull.
Day 1
As soon as she came out of the water the vibration culprit was revealed. A length of Crab Trap rope. I never saw a trap buoy, but there are a ton out there and I found one, at least the rope anyway. Mystery solved.
 |
| Pressure Wash & Inspection |
While the boat was in the sling, I pressure washed it and inspected the hull. Looked good, no blisters. I am fairly sure it has an epoxy barrier coat on it. Next, I removed the damaged keel protector for repair. This thing certainly did it's job and protected our running gear. Go Pau Hana!!

Although the top flat bar had a little bow in it, the bottom vertical piece was bent badly. I went to a local metal fabricator and they sold me a piece of 1 1/2" x 40" x 1/4" stainless steel flat bar.
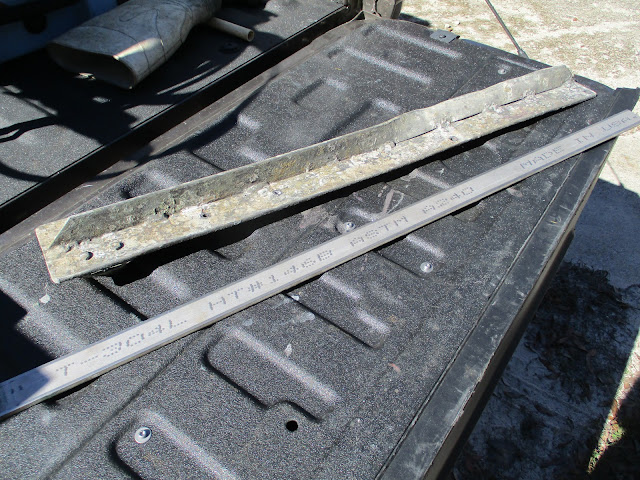 |
| 1/4" x 1 1/2" x 40" piece of Stainless Steel Flat Bar |
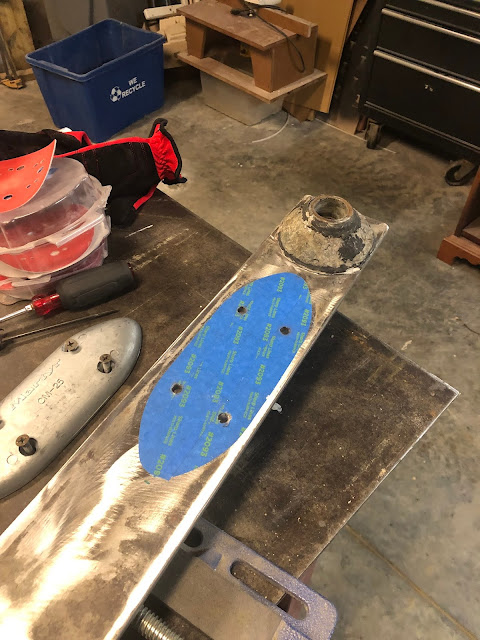
I took everything to my good buddy J.D. for repair. The vertical is tack welded along the bottom as a stiffener and was easy to cut off. He placed the flat piece in a hydraulic press and flatten it back out. A little grinding and some fine stainless steel welding and it was good as new! I had the yard guy order me a new zinc for the Keel as the old one was still there but probably 60% deteriorated.

With the keel protector repaired, I took it to my shop, cleaned it up and applied some zinc spray primer. I masked off the area where the new zinc goes to ensure a good bond.


Day 2
Back to the yard. With the boat now blocked up I removed the prop and shaft zinc and proceeded to prep for bottom paint. I taped off the water line, sprayed a few coats of anti fouling paint on the thru hulls and sanded a couple of spots. I could have sanded the whole bottom but didn't want to deal with the mess.

I didn't have enough time left to paint so I buffed out the starboard side of the hull. It was the worst side but still not bad. With some polishing compound and a cordless buffer it wasn't bad. I'll save the Port side for Friday before launch.
Day 3
Now for the fun (not really) I applied 2 coats of Pettit Hydrocoat. The hull took almost 2 gallons with enough left over to paint where the blocks were. This would give the paint more than the 16 hours of drying time required before launch. The paint can be thinned with 5 - 10% water but it seemed to go on fine and I applied it with a 1/4" Nap solvent based roller. This is back breaking work, at least for this old guy. The first coat took about 2 hours and I grabbed some lunch between coats.


With the paint done, I pulled all the blue tape off, cleaned up some and got to the prop. I applied a liberal amount of red tacky grease to the shaft taper and the inside of the prop. The small nut snugged the prop perfectly back into position, then I installed the big nut and tightened it up using some 5200 as an extra precaution to lock the nuts down. Inserted the cotter pin, installed the shaft collar zinc and recoated everything with some zinc spray paint, done!


Day 4
Splash day! High tide was at 3 pm so this would work perfect, not to mention the weather was fantastic for this whole job. 70 degrees and no humidity, can't get much better working conditions than this. I headed to the yard with my beautifully repaired keel protector (let's keep it that way). I adjusted the jacks so I could access the 6 spots on the hull to apply paint in those areas.


The front of the fiberglass keel right where the keel protector is bolted on originally had some type of rubbery material over the nuts, I assume it was to avoid a "lip" where a rope or debris could snag? The same material is around the Rudder Cup, a "rubbery doughnut" of sorts. I have no idea what the material is so instead I used some good quality Silicone and troweled it smooth.

With everything done and looking pretty, all that was left was to give everything some drying time. I buff and waxed the port side. Right around 2:45 at high tide she went in! Another great thing about the Camano 31 is that it can be retrieved and splashed with an adequate forklift. Some yards will charge less for the forklift than the travel lift, and it can be a whole lot easier.


Out on the water I tested everything and ran through different RPM's to see speed and to see if it would make the rated 3900 RPM. With the new 20" x 19 pitch prop she easily spooled up to 3900 RPM and may have been able to go a little over! This is great as I was lightly loaded with 1/2 fuel and water, not much gear and only me on board. I don't go max RPM's but I know that I am where I need to be.
I tested speeds with and against the mild current to get an average. It does appear that lowering the pitch from 20 to 19 did cause her to lose a little speed. As slow as I go that isn't idea but again, I know I'm where I should be. I also have the 20 x 20 as a spare.


Big difference nice and clean looking!
ReplyDelete