After Cooler
Keeping your boat in fresh water has advantages when it comes to seawater cooled engines. I have lived on a somewhat brackish/freshwater canal for 19 years. Every time I have removed a lower unit or a seawater cooled part for service or inspection, they have remained pretty clean due to a good freshwater flushing. Running from the Gulf up the Crystal River to home (a solid 45 minutes of freshwater in a warmed up engine) is convenient and good for the longevity of the system.
This is the last part of the cooling system I intend to clean & service (for now, not forever). There is still of course the transmission cooler & the oil cooler (I have no fuel cooler which is just as well) but based on what the Heat Exchanger & the After Cooler insides looked like, I feel pretty confident the other two are fine.
So what does the Aftercooler do? The Aftercooler (also sometimes referred to as the Intercooler) cools the intake air that has been heated by the turbocharger during pressurization. The charge air exits the turbocharger or "turbo" and is highly pressurized. The pressurized air can reach temperatures in excess of 300 degrees. The Aftercooler contains a bundle of tubes with seawater flowing through. The charge air flows over the outside of the tubes. There are thin tightly spaced cooling fins attached or stacked perpendicular to the tubes like the fins on a radiator which provide a greater cooling surface to transfer the heat from the charge air to the passing seawater.
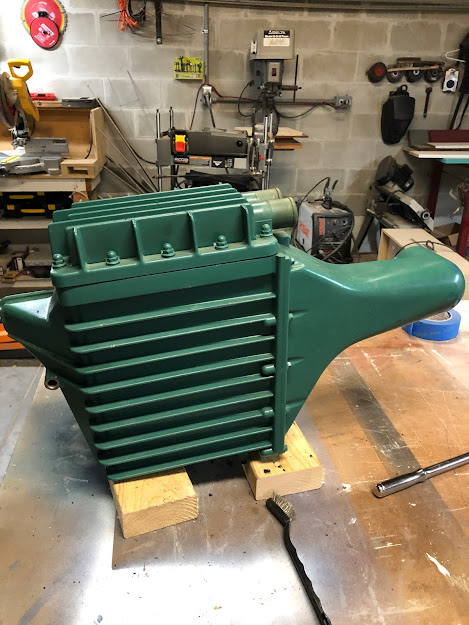
Removal of the Aftercooler on the Camano was pretty easy & straight forward, a seawater intake and exit hose and mounting bolts. This Aftercooler "core" came right out. Not always the case especially if water has crossed over to the air side and caused corrosion in the housing which is almost always aluminum. That was the case with my last boat. It was not pretty and it made removal of the core very difficult (and expensive), to the point I ruined my soft copper core and had to buy a new one and my housing had some corrosion issues so beware! Below is a picture of the Cummins After Cooler housing and the new core.
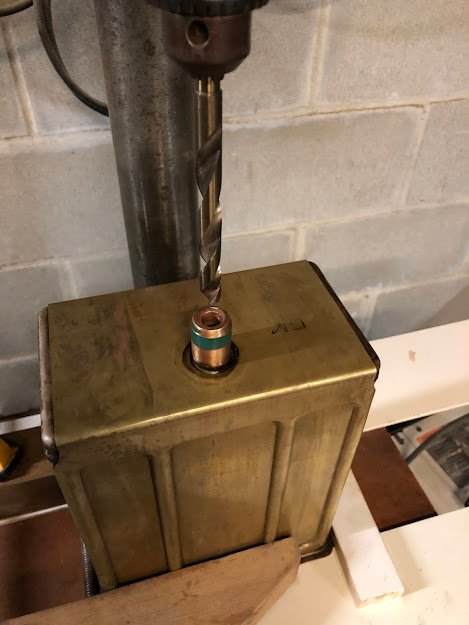
Nothing, and I mean nothing ever seems to go off without a hitch, especially when it comes to boats. On the bottom of the Aftercooler is a seawater drain that was being used to pipe water to the dripless shaftseal (mine is still not dripless until I replace it). The fitting used was brass and threaded into the copper drain and like any dissimilar connection of metal it's prone to corrode, starting with the lowest quality, in this case the cheap brass fitting. Attempting to remove the hose to the shaft, the fitting snapped off with very little effort. Damn it! Well, better now than in the middle of the Gulf.
I'll address the fitting as soon as the left hand drill bit & correct tap show up at my shop.
The core itself looked really good. I removed all the seals and had an OEM Volvo seal kit on hand I had ordered. As I did with the Heat Exchanger I mixed up a 1:10 muratic acid and water (plugging the drain) and poured it in to do it's work.
After sitting for a few hours and flushing it out with freshwater and some baking soda to neutralize any residual acid it was ready for reassembly....as soon as I can get the new water fitting tapped in.
I started by trying to drill out the old fitting with a 3/8" Left Hand drill bit, sometimes a left hand bit will spin the old bolt or piece out...that didn't work. At least now I have a 3/8" LH drill bit. Next I went ahead and drilled the drain with a 27/64" drill bit so I can tap the 1/2-18 thread for the new fitting.
The soft copper tapped easily and the new threads appeared to be right in line with the existing ones. The fitting is tapered so it was snug but it worked! I inserted a new barbed fitting for the shaft seal.
I put all the new seals in place using a liberal amount of marine grease and assembled the unit. Everything seemed to slide into place perfectly (fingers crossed).
The After Cooler is ready to go back on the engine and check for any leaks! After placing the After Cooler back on the engine, I went ahead & poured some vinegar & water in the hose connected to the transmission cooler & let it "cook" for awhile, probably should have left it for a couple hours but frankly I was anxious to get the motor started. With the motor started, I checked for leaks and all looked good. Interesting that some brown gunk came rolling out of the exhaust into the water, no doubt from the solution in the transmission cooler. One more project down.


Just had the exact same issue with the barbed fitting on my 2002 camano. I was able to just back out broken bit with an easy out. Debating if I should replace in kind or go with OEM cooper nickel plug and re-route water supply to a T fitting on hose just upstream of exhaust elbow injection.
ReplyDeleteNot sure if you even need the water supply to the shaft, as slow as it turns. Probably could just plug it.
Delete